Comments

Keeping up with the inexorable rise of front end frameworks is a big challenge in modern web development is. My pathway is probably fairly common, starting out with jQuery and the humble selector, progressing onto Knockout and embracing the joy of binding then finally onto the full on framework smorgasbord of Angular JS. Now there is a new project on the horizon and Angular 2 has reached a good level of maturity, so “Once more unto the breach, dear friends” it is time to embrace the new all over again!

Our project stack is a fairly standard .net picture, an ASP.NET MVC application on the front end talking to a REST API server side based on Web Api. Angular 2 sits firmly in the front end application and can be installed through node. I won’t go into details of that setup here as Deborah Kurata has already covered that off in her excellent Angular 2 Getting started with Visual Studio post, however the point where I hit trouble was getting the application to build on our TeamCity build server.

Its Javascript Jim, but not as we know it

A big benefit of Angular 2 is its built in support for coding in TypeScript, a strongly typed superset of JavaScript that can be transpiled into JavaScript before it is executed. While TypeScript has been around for quite a while now (compared to Angular 2 anyway!) and is baked into Visual Studio I still needed to get the newest version to enable visual studio to build the scripts. This was simply a case of downloading the latest version of TypeScript for Visual Studio 2015 and installing.

Once the installation step had been repeated on our build server the compiler also ran through TeamCity. So far so good, however we didn’t have the node_modules folder checked into source control (as they are external dependencies containing a crazy number of files!) so the Angular 2 source libraries were not present. Naturally this was a sticking point in getting our javascript code to compile or indeed run as Angular 2 didn’t exist in the application on the build server! To fix this we needed to download all the dependencies in the node_modules folder during the build and save them into the expected location in the build servers workspace.

Hey node, give me the dependencies

TeamCity has a great plugin model which allows it capabilities to be easily extended and a quick google revealed that a TeamCity Node plugin already existed. After installing the plugin, along with Node on the build server, I was able to add a build step to execute the following command:

npm install

When this command is executed from the directory of our MVC application it interrogates the package.json file and installs all the dependencies listed in the json file. Well, that’s what it should do, in my case all I got was a long pause followed by a network timeout, doh!

I was prepared for this as we are working behind a corporate firewall and I’d already spent quite some time finding out how to get a connection from my development machine. The solution, using the Cntlm Authentication proxy, is handily documented on StackOverflow in this NPM behind NTLM proxy article. However after following all the steps on the build server the network connections were still failing. I tried running the npm install locally on the build server and it worked fine so it seemed that the npm proxy settings were not being used when the program ran through TeamCity. After quite a bit of head scratching I resorted to reading the npm manual and there were some clues as to why the config might be ignored. When I looked in my C:\Users\{MyUsername}\ folder I could see a .npmrc file with the proxy settings, however there was no such file in the C:\Users\{TeamCityAgentUser}\ folder. So I copied my .npmrc file into here then bingo, it all worked through TeamCity!

I’m sure this won’t be the last challenge Angular 2 throws at our Dev Ops efforts but we are in a good place now with the build running inside TeamCity.

Comments

I’ve been using Kudu to automate my website deployments from Github to Azure for quite a while and its worked out great. But there are some limitations with it, primarily a lack of control over whether changes are deployed, its very much an all or nothing tool.

The complexity of the web application I’m maintaining reached a level where I wanted to ensure that the code builds and passes some automated tests before it is deployed. I couldn’t see any way to incorporate those steps into a deployment pipeline with Kudu so decided to try AppVeyor. I’d heard about it on Scott Hanselmans blog and as it is free for open source projects I’d been itching to give it a go!

Build it, build it

The first step was to get the website to build. Surprising as it may seem the website had never successfully built in Visual Studio as it used an old version of Umbraco which had some compile errors. My options were to either upgrade to a newer version or try and fix the compile errors. The upgrade route looked like it could take some time and fortunately Umbraco is open source so I could download the source code for the version with the issues and patch some fixes. It proved fairly straightforward, basically they has just missed out some files during the packaging of the version.

So now the website built locally in Visual Studio, however MSBuild still refused to build the site, not great as AppVeyor uses MSBuild to compile the website! After some research I found that the problem was to do with MSBuild attempting to not just build the website but also publish it. As the project is an old style Visual Studio website as opposed to a web application the options through MSBuild were somewhat limited as it only exposed a subset of the options for the aspnet compiler. However I found that the publish option could be disabled by manually tweaking the solution file to remove the settings controlling the publish of the website, if your interested in the details you can see the change for this in this commit. The only drawback with this technique is that Visual Studio trys to helpfully replace these settings each time you save a change to the solution file, another option I may investigate would be to use a custom build script in App Veyor.

The only additional setup I needed to take to get AppVeyor to build the projects was to tell it to restore the nuget packages, as I hadn’t checked them into source control. This was simply achieved by adding the following ‘Before build script’ to the AppVeyor project settings:

nuget restore

Tasty Tests

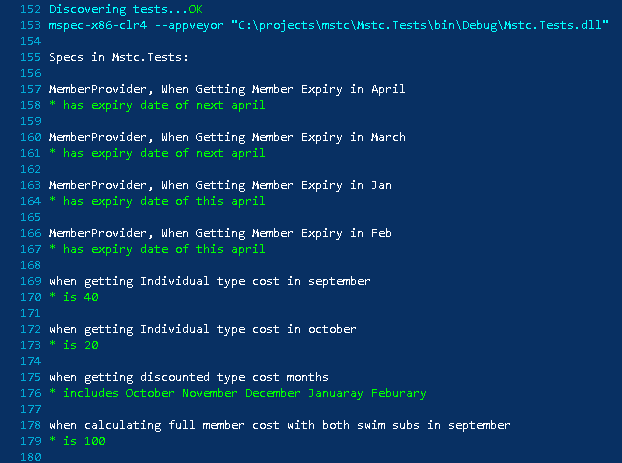
With all the solution projects building the next step was to configure the tests to run. With AppVeyor this is a zero configuration step as it auto detects any projects containing unit tests and runs them. However to speed things along you can explicitly define the path to the assembly containing your tests in the AppVeyor settings. After doing this AppVeyor gives a test runner output in the console (shown below) along with a nice testing report which you can see directly in AppVeyor here.

AppVeyor, meet Azure

The final part of the jigsaw was to setup automated deployments, my requirements for this were:

  • Deployment to be triggered after a successful test run (default AppVeyor behaviour)
  • Deploy all added, deleted and changed files to Azure
  • Deploy changes commited to the staging branch to the staging site
  • Deploy changes commited to the master branch to the live site

AppVeyor has a range of options for deployment including several specifically for Azure Cloud sites. However as my application is an old website I just wanted a basic file orientated publish and Web Deploy offered what I was looking for. There is a handy guide on the App Veyor docs for setting up Web Deploy with Azure sites so I won’t repeat that here. However there were some custom configuration steps I needed to take:

  • Add a path to the artifacts in App Veyor. These are the files which Web Deploy phyically copys to the Web Server. In my case this was just the whole ‘website’ directory.
  • Check the ‘Remove additional files at destination’ option to ensure files I’ve deleted locally are removed from the web server.
  • Specify ‘Skip directories’ to ensure assets and cached files for Umbraco are not removed. For my site the ‘Skip directories’ setting is ‘\App_Data;\media;\data’.
  • Setup 2 separate Deployment providers, with the ‘Deploy from branch’ option set to ‘staging’ for the staging site and ‘master’ for the live site.

So now whenever I push changes up to github App Veyor checks which branch I’ve pushed to and runs the deployment provider setup for that branch, you can see what has happened at the end of the console report. I’ve been really impressed with the usability and range of options available in App Veyor, it all comes at an unbeatable price of totally free for open source projects and best of all I get to put these cool badges on my repo now!

Comments

The software design process can sometimes be difficult to quantify. From an external perspective of a development team, requirements go in and working software comes out. But what exactly happens in the middle to turn the stakeholders hopes and dreams into reliable, executable code?

At its core software design is a methodical, incremental engineering process and there are no short cuts to this process if we want to produce good results. However making really great software that will stand the test of time often requires a little something extra, a bit of inspiration. So where exactly does that spark come from and how can we help create the conditions to nurture it?

A sticky design problem

I’ve recently been working on a feature to enable users to update their profiles through a web application. This is a pretty standard problem however some extra complexities were introduced by the target platform. Chief among those was the user interface which needed to be asynchronous and fit in with the applications existing front end SPA framework.

I like to implement using the ‘outside in’ approach so began with the user interface, adding one section at a time then abstracting any common patterns to make them reusable. However, after a day at the coal face writing code I took a step back and wasn’t pleased with my results. The code was reaching a point where I was struggling to keep track of the workflow in my own head which doesn’t exactly bode well for the poor guy that would inevitably need to modify it 6 months down the line. The trouble was no matter how hard I stared at those lines of code a more elegant and simple solution would not present itself!

The very next day I woke up feeling sick and not be able to get into the office to finish implementing the UI. However, it may well have been the most productive ‘time off’ work I’ve had in some time. As I recuperated watching Hobbits and Orcs do battle on a grand scale my mind drifted back to the problems I’d been having yesterday. It suddenly became clear to me that I had been abstracting at too low a level and trying to fit all of the behaviour into a single javascript module. However if I just created a single module per user profile element I could create a common ‘interface’ for each module and easily iterate over them in the main module.

Emergent architecture

This new approach had all the hallmarks of a good design as my own reaction was along the lines of ‘that is so obviously better, why didn’t I just do it like that in the first place?!’ That is a pertinent question, and one that has probably troubled many a software developer. However my feeling is that often it is not possible to skip the ‘bad design’ and go straight to the better solution because you don’t know what all the problems are going to be until you start implementing. Thomas Edison summed this up nicely in one of his most famous quotes:

What it boils down to is one per cent inspiration and ninety-nine per cent perspiration.

While its certainly true that experience can help you see patterns and spot the problems earlier I think it is a mistake to try and design everything meticulously up front. There is bound to be some devil in the detail which makes you pivot on the design halfway through so a lot of that up front time will have been wasted.

I find it is best to have a balance, with an initial high level draft plan for the implementation usually implemented through UML modelling. This helps guide lower level design decisions and keep one eye on the bigger picture. To make the lower level design decisions I try and stay agile, adapt the code as I’m going along and keep complexity at a minimum.

Encouraging those aha! moments

Often my best ideas are formed away from the computer, hours or even days after the initial problem arose. The sub conscious mind is an amazing tool which can help you solve many intractable issues if you can give it the space and time to join up those dots. Despite what our employment contracts may say, software development really isn’t a 9 to 5 job. In fact working ‘harder’ during those office hours can sometimes be counter productive when it comes to making great software. Good decisions and great solutions are formed in relaxed and fresh minds, for that reason I’d have to list my bike as one of my most essential software design tools!

As developers we can encourage good software design by focussing on a couple of key elements:

  • Collaborate on design, decisions should be guided by the ten commandments of egoless programming
  • Ensure your estimates include enough contingency to allow for rapid prototyping and iterations during implementation.
  • Stay pragmatic; aim high but know that perfection is subjective. Establishing coding standards can help guide when a design is good enough

Do you have any particular techniques to help inspire your software designs? If so I’d love to hear about them and try them out myself!

Comments

The path to Git enlightenment can be a long one for a developer used to centralized source control such as SVN.

The first signs of trouble usually occur when trying to apply changes from one branch of code to another. Some file change conflicts are likely if the same source file has been changed on both branches. The source control system has no way to know which changes should be kept so it will quite rightly ask the developer to choose, however this can cause some difficulty if the changes have been made by someone else who may not even be around to ask what has happened.

I have a feeling that the great Mr Miyagi would have loved using Git, as patience and dedication to the ways of DVCS are well rewarded in time. Indeed, dealing with branches is one situation where patience is important to avoid introducing regression bugs.

Patience, young grasshopper.

There are a couple of different techniques which can be used to bring the changes on two branches together and the Atlassian site has a great write up of these in it’s merging vs rebasing article. The article describes the following scenario, you have created a feature branch from the master and made some commits to your branch. Someone else has since made some changes to the master branch which you now need to include in your branch, to get these changes you can either merge or rebase.

My personal preference is to use the rebase command where possible for one key reason, merge conflicts are easier to resolve! The reason for this is that when rebasing you apply your changes on top of the master changes. This is different to a merge which will apply the master changes on top of your feature changes. So effectively any conflicts which occur will be due to changes made by yourself instead of someone else. My memory may not be great but I stand roughly 100% more chance of remembering something I’ve done as opposed to something someone else has done!

Hopefully you can see the benefits of this and are thinking, ‘great I’m going to give that a go!’ But before you rush off a few words of warning, there is potential for things to go horribly wrong.

First learn stand, then learn fly

The trouble comes if there are 2 people working on the feature branch who have both pushed changes to a remote repository. If you haven’t fetched their changes before you push the rebased feature branch their changes will get overwritten and lost forever! That would be bad but Git does try to help you out by blocking the push, actually the only way you can push the rebased branch is by passing an extra parameter to force the push. So this acts as a nice reminder to think about what you are doing, only tick that ‘force push’ box if you are sure your branch is fully up to date. Actually I’d never use rebase if I had any doubt that anyone else might be working on the same branch as me.

A final note about rebase, it may be difficult to carry out with some Git GUI tools. Some of my colleagues like using Source Tree and I’ll agree it does look nice, however it doesn’t support this workflow well at all. After starting a rebase you get left in a weird limbo state and have to keep re-requesting to rebase the branches after each and every commit. Then once the rebase is complete there is no way to force the push through the UI, you have to drop down to the command line to complete the action. I’d recommend giving Git Extensions, the reliable Ford Mondeo of Git GUIs, a go for this scenario, it work much more smoothly.

Comments

In the first part of Making awesome software with Lean principles I started looking at how Lean principles have helped me while working on the Mid Sussex Tri Club website.

The first three principles Eliminating waste, Amplifying learning and Deciding as late as possible are all fundamental to help guide software development. However they only form part of the picture, there are still four more principles remaining that help guide our decisions so let’s take a look at them now.

Deliver as fast as possible

In the era of rapid technology evolution, it is not the biggest that survives, but the fastest. The sooner the end product is delivered without major defects, the sooner feedback can be received, and incorporated into the next iteration.

I’ve seen the benefits of an iterative approach over and again throughout my professional life so I regard this as an essential principle to apply to all software projects. I put in place a pretty slick release process as one of the first changes I made and have been reaping the benefits ever since. Basically any check-ins on the master branch of the source code repository are immediately deployed to the website. I’ve already blogged about how I set-up this ‘zero-click’ deploy process and it has worked largely without problems since set-up.

However, this technique must be used with caution and certainly in tandem with the ‘Build quality in’ principle. It is essential to ensure that a suitable branching process is in place too and changes can only be deployed once they have been tested. If you are working in a larger team I’d recommend limiting write access to the master branch to a single person who can coordinate the deployments. While automation is great for productivity people still need to understand how it all works and retain control of the systems.

Empower the team

The lean approach favors the aphorism “find good people and let them do their own job,” encouraging progress, catching errors, and removing impediments, but not micro-managing.

I have been fortunate to be involved with an organisation that trusted me to make the technical decisions. I presented my ideas on the features to implement and got feedback on any changes they thought may be needed. So I was empowered to make the changes as and when they were needed. However I also think it is important to ‘bring the stakeholders with you’ when making the changes. This has several benefits, not only does it help ensure that the features are relevant, it also gives me some good candidates for people to test the system before it goes live, which brings me neatly onto the next principle!

Build quality in

Conceptual integrity means that the system’s separate components work well together as a whole with balance between flexibility, maintainability, efficiency, and responsiveness.

As I mentioned earlier, this principle acts as a counterweight to some of the other Lean principles, such as Deliver as fast as possible, to help ensure that changes are not rushed and the software doesn’t accumulate bugs and brittle implementations. For this project I’ve not had the luxury of any other developers who could review the code, however I’ve still ensured that changes are functionally reviewed before deploying them to the live site. To facilitate this I’ve setup a ‘staging’ environment using the same deployment technique running off a separate ‘staging’ repository branch. I first implement the changes on the staging branch and only merge them into the live ‘master’ branch once someone has tested them out on the staging website.

On one occasion I skipped the staging process and fate taught me a lesson! The update was to use an Umbraco plugin to automatically resize images but little did I know that there was a memory leak in the Umbraco plugin which meant the site quickly went over its memory allocation and Azure automatically took it offline. That was a nasty surprise to find on the live site and some load testing in the staging environment would certainly have helped!

See the whole

By decomposing the big tasks into smaller tasks, and by standardizing different stages of development, the root causes of defects should be found and eliminated.

There are two key elements to the last principle, See the whole. I’ve already talked about how the staging and live environments are standardized, in my case this was a fairly trivial exercise made easy by modern hosting tools such as Azure and github that enable multiple environments to be set up at very low cost. The small fee to run an extra Azure database is well worth the value it adds for the club.

The second element recommends splitting tasks into smaller pieces and is certainly one that I’d advocate. Limiting the number of changes made at any one time really helps with tracking down issues. Its a practice which I’ve learnt the hard way over the years, it can be tempting to try and ‘fix the world’ when you get your hands on a code-base and hammer out a high number of changes in a short time. However, not only does this massively increase the probability for bugs, it also makes finding them much more difficult. Looking for a bug in a commit with 50+ changed files isn’t much fun!

I’ve used the github issue tracker on this project, which may seem a bit odd when there is no one else to share the work with, however it has helped keep me focussed on what I’ve been trying to achieve, also its nice to get the satisfaction of pressing the ‘Closed’ button after fixing each issue!

Lean == Awesome

I hope you’ve enjoyed reading about my experiences with Lean principles. I’d love to hear about any opinions you’ve got regarding the way I’ve interpreted the principles or how you’ve used the principles to make your own awesome software, so feel free to comment on the posts below!

Copyright © 2016 - Hook Technologies Ltd - Powered by Octopress