Comments

Why Azure

I recently inherited an Umbraco version 4 site and need to setup web hosting for it. I decided that Azure would be a good option for hosting as it offers great benefits for future scalability and a good costing model. I also wanted to try it out and see what all the fuss is about!

There were a few steps to carry out to get the site up and running in Azure, so I’ve documented my experience here.

First steps

  • Obviously you need to sign up to a Windows Azure account. Its free to try but you do need a credit card. I guess this makes it nice and seamless for Microsoft to start charging you if you opt to continue past the 1 month trial!
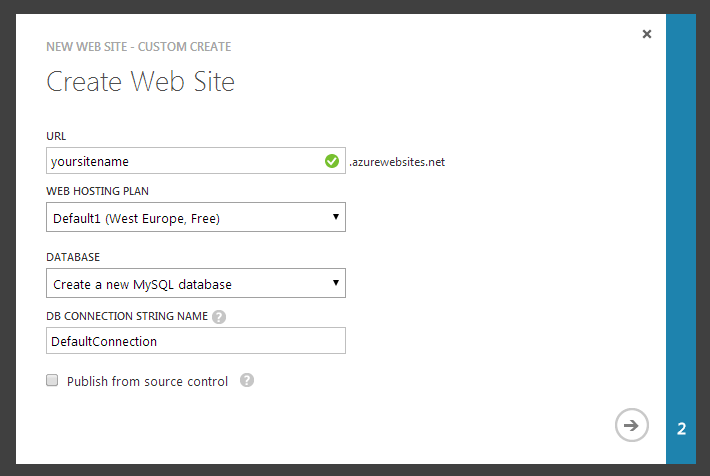
  • Now login to the portal and go to Websites –> new –> custom create –> enter details, selecting a mysql database from the drop down

Migrating the database

  • Click on the new website and go to the ‘linked resources’ tab. The MySql Database should be listed here
  • Click the name to open ClearDB (the third party provider of MySql databases support for Windows Azure)
  • Setup MySQL workbench to connect to ClearDB using an SSL connection. You may also need to install OpenSSL to enable generation of the rsa key.
  • Reduce the database size to fit in the 20MB size limit by removing old document versions and preview / log files.

Uploading the web site

  • Download the publish profile file from your azure account. It is available on the dashboard page of your website, under the ‘quick glance’ menu
  • Open the site in WebMatrix, press publish and browse to select the publish profile file you just downloaded.
  • Web Matrix will now run a diff on the files and prompt you to upload any changes to Azure.
  • In Azure go to the site configure tab and set the app settings for ‘umbracoDbDSN’ and any other connection string values to the ClearDB database connection string. If you are not sure what the connection string you can get it from the ‘quick glance’ menu.

I like this ability to set your production connection strings / app settings in Azure. This will be help enable me to open source the code without storing these secure settings in the config files themselves.

Hey presto, your site should be up and running!

So, what’s the verdict?

Is Azure as nice a hue as promised or is it more murky in practice? Well from my experience its all worked pretty much as expected so far. Its clear the Microsoft has invested some serious resources into the platform and unlike some of their other products (ahem Windows 8) the usability is excellent.

I think this is a decent work flow to initially get a site up and running. However in the long term I would want to hook up source control for the site to publish when merging to a branch. There is an option in Azure to ‘Set up deployment from source control’ so I will be investigating how this works next.

The main drawback I currently see with this setup is that the database has a limit on the number of connections. The free version has 4 which is fair enough, given it is just for trialling. However even the paid versions have low limits of 15, 30 or 40 for $10, $50 or $100 respectively. My feeling is that these limits may well cause problems when the site is running in production. I already hit the 4 connections limit just browsing the site myself and publishing a new page and it is bound to use more when real users are browsing at the same time.

The SQL databases offered in Azure do not have this connections limit and would also be significantly cheaper in the long run, so I will be investigating the feasibility of migrating the Umbraco DB from MySQL into SQL.

Comments

Software design and development techniques are constantly evolving, making the discipline a fascinating area to work in. Over the time I’ve been working as a developer I’ve seen various approaches to design from Code First, Data Driven to Domain Driven (DDD). My preference is to consider the scope of the problem first and design a solution to match and DDD is a good fit for this. However when looking at enterprise level problems we need to give more consideration to how a problem will scale… enter Event Storming.

Distributed design

I work in a development team which is responsible for several key business capabilities, there are already some software solutions in place for these capabilities however they were designed several years ago to solve problems at a scale at least an order of magnitude below where we currently find ourselves. Our stakeholders have expressed a desire that we could redesign a solution which would meet our current needs better, basically it needs to work faster, do just what is needed and ideally scale so that it will still perform well at the next order of magnitude up.

We decided to have an Event Storming session to help us analyse the problem and come up with a high level distributed solution. We carried out the session in a couple of phases, first we reviewed the current solution, then we looked at the primary goals for the redesign then finally we started event storming a solution. Here are the team hard at work mid-storm:

Collaborative analysis

The session first involved us all writing down on post-it notes business events that had some relevance to the feature we were analysing. We then stuck all these onto a big board and de-duped them. It was a bit tricky to order the post-its at this stage so we went for a loose left to right time sequence.

Following this we got the post-it stack back in action and wrote down each of the commands that could have some influence on the events on the board. Then we linked each of the commands to events on the board, this wasn’t always a one-to-one relationship which presented some practical problems, however on the whole I think working with physical post-its was far better than using something like Visio as its more democratic. Finally we arranged the post-its into discrete pieces of behaviour and mapped out the interactions between them.

It was important that we recognised the difference between an event and a command during the exercise. As a rule of thumb commands are carried out by users and events are raised by the system to indicate something has happened. For example the Create Product command is raised when the user saves a product entry, whereas ‘Product Created’ event is raised after the transaction has finished and a product has been persisted in the system. As I alluded to earlier there is no hard one-to-one relationship here, a single command can often result in multiple events being raised and vice versa. Its important to make sure the distinction is clear to everyone before the session begins, it saves a lot of time in the long run!

The results of our session can be seen in the picture below:

A virtual solution

By the end of the session we had a virtual solution figured out that could be implemented with discrete modules communicating exclusively via messaging. I was pleasantly surprised by the elegance of the solution, by focussing on the interactions between the systems and isolating responsibilities it was clear that we only needed to pass a small amount of data between each module and could effectively encapsulate the behaviour. However Event Storming is just one technique and I wouldn’t suggest it is a magic bullet design technique, these are the main pros and cons as I see it.

Advantages

  • Helps focus on the interactions between elements of a distributed system
  • The whole team is involved at the analysis stage and visualize the same proposed solution
  • Encourages scalable solutions

Drawbacks

  • Reliant on domain knowledge of team members to surface events / commands
  • Design can get lost in a sea of post-it notes!
  • Need to transfer quickly to implementation tasks to avoid losing insights

I’d be interested to hear of your experiences of event storming and how effective you have found it to be?

Comments

There comes a time in a developers life (every couple of years it seems) when you are dissatisfied with your existing blogging platform. What had started as a beautiful and fulfilled relationship has decayed to the point where you barely interact. What once seemed like a cutting edge editing interface has become stayed and obtuse. Your eyes begin to wander, other blogging platforms seem so slick and modern in comparison, you wonder “why can’t I have some of that?”

But there is no need to fret, unlike other breakups this change should be quite painless for all parties involved. So as January is the peak month for relationship change, there is no better time to ring the changes and introduce a new blogging platform!

No more Batman and Robin

You may ask what my blog has to do with the dynamic crime fighting duo Batman and Robin? Well the new platform is based on Jekyll, which is quite the opposite of dynamic. Using the power of Jekyll I can now generate all the static blog content (html, images, css) locally by running a couple of commands. Then I just push the changes up to github and boom, the updates are published.

I really liked the simplicity of this approach as a blog is pretty much all about the content, there are no interactive features or dynamically changing content that would require a processing engine. The functionality can be met with good old static html. There are also a bunch of other great advantages to this approach:

  • Use of Markdown for content editing
  • Faster page load times
  • More tolerant to high loads (although I doubt the traffic on this particular blog will ever cause a problem!)
  • Free web hosting with github pages
  • Scratches my developer itch for getting my hands dirty with the blogging platform

There are some drawbacks to this approach such as a higher barrier to entry for editors, however as I’m the only editor that isn’t a problem for me.

Wordpress meet Octopress

Having settled on a new platform I needed to extract the content from my existing wordpress blog and convert it into a format suitable for Octopress (ie. Markdown). Fortunately this is a fairly well travelled road and my posts were pretty basically formatted so the conversion process was pretty painless. The most important issues for me were to not lose formatting of the content and retain the same permalinks so existing google / bookmark links would still work.

I got the blog running pretty easily (as it runs through Ruby, which is already setup on my machine) however the default theme wasn’t really doing it for me. Fortunately there are a bunch of alternative themes available that a pretty straightforward to apply. I opted to use the greyshade theme as a base and tweak the fonts / layout to suit my needs.

Images / Comments

So at this point all the posts are in the blog nicely formatted but the images are still being served from Wordpress and even worse the comments have not been ported at all.

I considered just dumping the images into the new blog platform itself, however I felt like there should be a better solution. Whilst my blog is pretty tiny at the moment the number of assets are bound to grow over time and I didn’t want to cripple the blog hosting server itself with unnecessary load. Initially I tried uploading the images to Picasa, however it seems to require a desktop app to upload the images and refused to give me a proper URL for the image sources. A far better solution for me was ImageShack, uploading is handled through a slick browser based interface and you can easily get direct links to the images. A nice bonus for the platform is built in support for image resizing, all you need to do is specify your required size in the image link.

The final part to integrate was the comments. This turned out really straightforward using Disqus. All I needed to do was sign up for a new account and point it at my existing wordpress blog to pull the comments down. You can enable Disqus in Octopress through the config.yml file. Then, provided your post links are maintained, when the blog is switched across the comments are also kept, simples!

Conclusion

So there you have it, a freshly baked blogging site for your consumption pleasure, enjoy!

Comments

There are a number of design patterns which I have chosen not to implement a coding kata for. This is because I felt that I would either not use the pattern regularly in practice or they have alternative solutions that make the pattern redundant. However I think it is worth calling out these patterns and summarising how they work.

The decorator pattern

This pattern provides a way of extending a classes behaviour without using inheritance, it is defined as:

The decorator pattern extends the functionality of individual objects by wrapping them with one or more decorator classes. These decorators can modify existing members and add new methods and properties at run-time.

The main reason I won’t be using this pattern much in practice is that the class structure it generates is not very clear and also the behaviour of the classes can change depending on the order they are instantiated. So I think implementing this pattern could cause more problems than it solves, especially if the system may need to be maintained by different people at a later date.

The factory pattern

The factory method pattern allows for the creation of objects without specifying the type of object that is to be created in code. A factory class contains a method that allows determination of the created type at run-time.

Whilst the factory method has its uses it is basically just an implementation of sub classing, where parameters are defined as base classes to allow different derived classes to be passed at runtime. It is a straightforward pattern and the coding kata would be pretty short to implement it.

Also one of the main issues the factory pattern tries to solve is centralising object creation, however we generally use IoC containers which provide low maintenance dependency injection out of the box. So this removes the main need for the factory pattern.

The Singleton pattern

Ensure a class only has one instance and provide a global access point to it

asparagus shoot from http://sandyspringcsa.com/ This is a pattern which can be very useful in applications, however the implementation is so short that a coding kata would have little content. There are just a couple of pitfalls to watch out for when implementing this pattern:

  • Ensure the implementation is thread safe In Java the synchronized keyword can be used on the method which returns the singleton to ensure only a single thread ever has access to the class at once. However that can lead to the second pitfall
  • Consider whether you implementation offers the best performance Using synchronization is expensive (ie. It takes the computer a relatively long time to process)

This implementation avoids both of these pitfalls by creating the uniqueInstance when the class is first loaded:

public class Singleton {
  private static Singleton uniqueInstance = new Singleton();

  private Singleton() {}

  public static Singleton getInstance()  {
    return uniqueInstance;
  }
}

Finally, as with the factory pattern, if you are using an IoC container then they generally provide a way to configure a class as a singleton so there is rarely a need to implement this pattern manually yourself.

There may be more…

Stay tuned for more patterns to be added to this post!

Comments

The second design pattern I will be looking at is the Observer pattern, which is useful for safely passing data between objects. The Observer pattern is defined as:

“a one-to-many relationship between objects so that when one object changes state all it dependants are notified and updated automatically”.

A good analogy for this pattern, described in the excellent Head First Design Patterns book is that of a magazine publisher and subscribers. Here the publisher is the one in the relationship and the subscribers are the many. Typically the publisher will notify each of the subscribers of a new magazine edition by sending them the magazine in the post or through their e-book subscription. Translated into the Observer pattern the Publisher is known as the Subject and the subscribers are the observers. The subject notifies the observers of changes in its state.

Some important features to note about this pattern are:

  • Observers can not change the state of the subject and vice versa (ie. they are Loosely Coupled)
  • The state information can be either pushed out to the observers by the subject or pulled from the subject by the observers
  • Observers can be added and removed at any time

The brief

This is our fictitious brief for a new system which needs to be designed. It is election time and the polls are coming in. A local TV station would like us to design a system which can keep track of the results as they arrive. There are several hundred constituencies (areas of the country) which may declare for the Blue, Red, Yellow or Green party. The TV station wants to present this data in a number of ways:

  • As a leader board, showing the tally for each party
  • As a map, with each region coloured to the winning party
  • As a Swingometer showing the proportional change and overall result

We don’t need to worry about the implementation details of these display methods, the algorithms will be provided by the TV station. Our main concern is how to design a system to pass the data between the election object and the display objects.

Designing the Solution

Here is the class diagram for our solution, if you would like to try implementing the solution yourself the starting point for the kata is tagged here: Observer Pattern Kata Start.

Observer pattern for election data

We have leveraged the Observer pattern in our solution. The Election object inherits from ISubject and each of the display methods inherit from IObserver. The Election object maintains a list of the observers, we can add or remove an observer to this list using the Register and Unregister methods. When the subjects Notify method is called it informs each of the observers that a change has occurred by calling their Update method. A completed implementation for the election scenario is tagged here: Observer Pattern Kata End.

Copyright © 2016 - Hook Technologies Ltd - Powered by Octopress