Setting Up the NUnit GUI
I’ve setup the project using the default ’S#arp architecture Application’ template. I won’t go into detail about the steps taken to do this as it is all covered in the Sharp Architecture documentation. However I did hit a snag setting up the NUnit project so I’ll expand on that in this post.
The Sharp Architecture template is setup for TDD (Test Driven Design) and this is the approach I will be taking to the development. Having installed TestDriven.Net, the tests can be run through visual studio, however I prefer the interface of the NUnit GUI. After each test run the results are displayed as a set of pleasing green ticks and/or nasty red crosses. Once you have a nice set of green ticks it becomes a bit of a fixation to keep it that way!
The unit tests for the visual studio project can be easily loaded into the NUnit GUI. All you need to do is go to File –> Open Project and navigate to the bin folder of the test project. Opening the compiled assembly (dll) of the test project will load all the unit tests into the GUI. Hitting the run button returns a nice list of green ticks as expected. However after saving the NUnit test project something alarming happens on the next test run. The standard Sharp Architecture Data tests all fail and nasty set of red ticks appear!
The following error message is reported:
SharpArch.Core.PreconditionException : Please add an AppSetting to your app.config for ‘nhibernate.mapping.assembly.’ This setting takes a comma delimited list of assemblies containing NHibernate mapping files. Including ‘.dll’ at the end of each is optional.
The error is pointing to a missing setting in the app.config file, however on checking the file the setting is present. Also the tests worked just fine before saving the NUnit project so why would they suddenly start to fail?
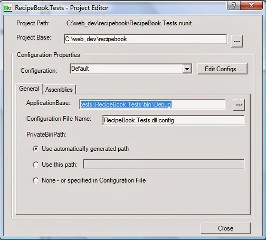
The cause of the test failures appears to have been saving the NUnit project, this pointed to some settings changes which NUnit may have made during the save. Taking a look at the NUnit project settings the possible cause of the problem became clear. There are a couple of directory and file paths in the settings, of particular interest are a ‘Configuration File Name’ and ‘ApplicationBase’ settings.
Configuration File Name When the test project assembly is first loaded this setting has a value of RecipeBook.Tests.dll.config, however after saving the NUnit project the .dll part of the filename disappears. So NUnit is no longer able to find the config file and read the settings from it.
ApplicationBase The ApplicationBase setting remains blank, however if you have saved the NUnit project in a different directory to the test project assembly you will need to change this. The path needs to be the relative path from your test project base to the test assembly location.
Below is an image of the settings for my project:
 After updating these settings NUnit was able to read the settings for the config file
and the GUI happily reported a lovely set of green ticks :)
